Tinkering with #bigmakerbook Lilypad Arduino Guitar Plushie

While I was at ISTE this year, I met Josh Caldwell from code.org. He told me that he’d just gotten a copy of the #bigmakerbook that Aaron and I wrote, and that he was working through the projects with his own kid. (WHICH I THOUGHT WAS SO COOL!) When he mentioned hacking my sewing circuit guitar plushie with Circuit Playground Express, I was intrigued! Aaron and I wrote this book back in 2016, and at that time, those intro boards and MakeCode didn’t really exist yet. So I thought it’d be fun to try out some beginner boards and see how they compare to programming the Lilypad Protosnap board.

Lilypad Protosnap

When I created this project, I knew I wanted to make a soft plushie guitar that only played music when you played air guitar. After speaking with the folks at Sparkfun (Thanks, Jeff Branson and Angela Sheenan), I landed on using the Lilypad Protosnap board (they’ve upgraded this board since I wrote this project, so now this is the equivalent.)

What I love about this microcontroller is that you can test your code before snapping the components off and sewing your circuits. Being able to run sketches before sewing (and not having to alligator clip them!) was amazing to me as an educator. Since I was still quite an Arduino noob in 2016, Trey Ford from the Denton Public Library helped me write the Arduino code. Together we decided to use the light sensor to pick up when the guitar player was actually  playing  “air guitar.” One other thing I really wanted was the guitar to play only when strumming and always play the next note when you started to strum. Trey helped me work out how to get that bit of code functional as that was the most complicated problem to tackle. Once we got that going, it was time for the fun of determining what notes to play on the piezo and the duration for each note. I chose Iron Man as the song for the guitar because I thought it would be hilarious to have such a metal song, pinging through a little tiny piezo buzzer. My hope was that if learners wanted to, they could easily change the notes to any song they wanted to play.

My favorite part of creating this though was mapping the circuit traces. It’s no secret that I’m a nerd for sewing circuits,  and I loved the challenge of creating circuit traces that were not only functional, but pleasingly aesthetic on the guitar plushie. I loved making it appear as though the conductive thread was part of the guitar design. For me, sewing circuits was a breakthrough in understanding the world of electronics and components. Breadboarding always confused me until I started sewing circuit traces. The act of physically mapping a circuit is a great way for beginners to understand these concepts.

So I still love the original project, but could it be simpler with one of these other boards?

Circuit Playground Express

The Circuit Playground Express hit ISTE last summer and I saw everyone walking around the conference waving magic wands. I was intrigued, but I’d tried the developer board previously because I was hoping it would be a good introductory board and I’d had some difficulty with it. I wasn’t sure how much they updated it.

I’ve tested it since, and the new Circuit Playground Express has improved a lot since the developer board. It can be a fun quick intro to the world of electronics and I love the embedded neo-pixel ring.

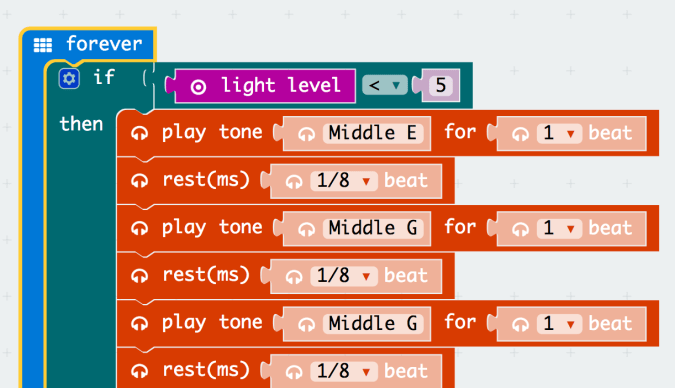
It was more complicated to program the song than I wanted in MakeCode, but only because I couldn’t figure out the ratio for the light sensor reading (until I looked back at the original Arduino code Trey helped me write.) After that, programming the music tones was fairly straightforward and I could alter note duration on each code block which I really liked being able to do.

Unfortunately, there doesn’t seem to be a way to make the code ONLY play when the light is covered, instead, the light going dim starts the song and because of the block coding (I’m guessing), the song will have to finish all the way through before the sensor picks back up the light reading. (I did try an if/else statement, but the code still ran all the way through. I’m sure one could tinker with the JavaScript and find a way to make this happen, but at that point, it wouldn’t be an introductory coding project.)

Screen Shot 2018-08-11 at 11.27.55 AM

So the coding experience was fairly straightforward, but the sound was a bit wonky (See the video below). My biggest complaint is only that there would be no sewing circuits if I wanted to use this controller instead of my Lilypad board. For me sewing the components is fun.My other worry is the AA battery pack for the Circuit Playground is very large compared to the tiny rechargeable Lipo battery for the Lilypad board. However, this board could still be a great way to get started testing a project idea, especially for beginners.

Micro:Bit

The code for Micro:bit was very straight forward, but I decided to try using the “on shake” as the event that triggered Iron Man because I thought that would be a good reason for a guitar plushie to start playing a song too! The thing I like most about the Micro:bit is that you can wire a speaker or headphones to it and the sound quality is pretty good. I even liked the idea of using the shake to play the song. But just like the Circuit Playground, the shake started the song and the song wanted to play all the way through.

Screen Shot 2018-08-11 at 11.35.27 AM

I also figured out that Micro:bit has a light sensor (through the onboard LEDS! Did you know you can use LEDs as a light sensor?) This was cool because I could use the light sensor like I did with my original project, however, I couldn’t get it to stop playing the song when the sensor wasn’t covered.  I’m wondering if this could be tweaked in Javascript too, so I guess I have some learning to do there.  The smaller battery pack on Micro:bit is nice, but still not as small as the Lipo.

Screen Shot 2018-08-11 at 11.56.29 AM

Being able to wire a speaker does make for a cool extension of the project I’ve been wanting to do for some time. Since the original piezo buzzer is pretty soft, I’ve always wanted to make a soft amp. How adorable would a functional stuffie/plushie speaker be??!?!?

Final Thoughts

I’m still the happiest with my original project. I like the idea of using a Micro:bit to test and try more ideas, but I am still underwhelmed by this board only having 3 pins. The Circuit Playground and Lilypad Arduino have way more break out options. But I do like both of these beginner boards for testing out ideas. I also like the functionality of the Circuit Playground, it’s just that I personally like sewing the components. It helps me understand how each component works. (Like to make a sensor work, you have to power it, ground it, and assign it a function through a pin. If everything is onboard, and I don’t have to wire it or sew it, how do I learn these things?)

In the end, for you, it depends on what you want to teach! Do you want to teach wiring components? Or do you want to teach if/else statements? What would you want students to learn from a project like this?

Watch all of the board play below:


Dj2uocvUwAAPrLe

Advertisement

Review: Chibitronics Love to Code Creative Coding Kit

Join the (7)

Making Paper Circuits with Chibi Stickers

I’ve been a fan of Chibitronics since I learned that these sweet little circuit stickers existed! In 2015, I learned a lot about circuits alongside my Circuit Girls when my Donors Choose grant for the Circuit Sticker Notebook was funded. I became pretty obsessed with making paper circuits because I was able to learn some of the fundamentals of electronics with my own hands! This obsession moved to sewing circuits because suddenly, this complicated thing known as Arduino became accessible to me (see my For the Love of Arduino post.) I no longer needed to understand breadboarding, I could just build my own circuits with conductive thread. (And through the magic of meaningful making, I now understand breadboarding from crafting sewing circuit projects.)

But wait…Programmable Paper Circuits?!

Last year, I was lucky enough to get a couple of Jie’s new clippable Arduino prototypes- the Love to Code Chibi Chip. This awesome little Arduino clip can be clipped onto a paper circuit so you can program your circuit stickers (or regular LEDS!) I was (and STILL AM) amazed at the ease and power of this tiny little board. However, the most AMAZING thing is that you and your students can program this microcontroller from your phone, iPad, or Chromebook. YES, ladies and gentlemen, from a CHROMEBOOK! No software download is necessary.  Check out the first few projects I made with the Love to Code board here.

Introducing the Love to Code Creative Coding Kit!

Now Jie and Chibitronics have a great new immersive and interactive coding book where you and your students can clip an Arduino board right inside this beautiful binder and program your freshly crafted paper circuits.

K-Fai’s illustrations bring Jie’s instructions to life. There are ample pages for children and students to create their own drawings and circuit traces. Which makes crafting and learning a joy in this all inclusive DIY kit.

We received the kit in November and my 8 YO daughter enjoyed creating and drawing her own circuits. However, the best thing about this kit (that astounded me) is that she learned to tinker with Arduino code and found confidence in programming her paper circuits with MakeCode.


She worked through the simple circuits, parallel circuits, and beginning coding projects. She loved adding hidden drawings that only appeared with programmed light.

Eventually, I started working through the book in some of the more complicated projects, because I really wanted a turn to use this book!

Love to Code / ChibiScript Platform

One of the coolest things about this coding platform with Chibitronics, is that students, teachers, and learners of all ages can program with any type of device (phone, Chromebook, etc) that has an audio jack. PLUS, they can easily find errors in Arduino coding in the ChibiScript platform. (Which is something that is really difficult to understand as a beginner Arduino coder in the original Arduino software.)

When Jie and I taught an ISTE workshop last summer based around the new Chibi chip, I was amazed to see that every educator in the room had success programming with this powerful little board. Most of these educators had never even made a paper circuit, programmed a microcontroller, or seen the Arduino platform before! See their explorations in programming paper circuits here.

27

Programming with MakeCode

My 8 YO preferred programming with MakeCode. Once I’d taken over crafting the circuits (because I really wanted to get my hands on the book… sorry kid….) I let my 8 YO program (and reprogram) the circuits. It was super easy to do, especially letting her just write her programs on an iPad. She loves this type of problem solving.


So….What’s in the Kit?

The Powered Binder– This amazing illustrated binder has 150 full color pages that can be removed, hacked, and crafted upon. Students can read through Fern’s story and learn alongside this funny frog as she learns how to make simple circuits, and how to program LEDs. The explanations are student friendly and the drawings by K-Fai are delightfully fun. I love how the book uses simple illustrations to cover big concepts. (I also heard that *soon* educators will be able to buy subsequent sections to fit into this same binder. There is room to grow both physically and mentally!) Plus, the binder has it’s own power source, so learners can plug right into this binder and be ready to program! This might actually be my favorite thing about the whole kit, a simple and quick power source solution.

The Chibi Chip on a Chibi Clip – The amazingly accessible Chibi board is pre-mounted onto a chibi clip. This is another simple solution that makes coding so much more accessible. The coder can just pop their clip down on a hand made circuit and test their code in seconds!  (No breadboarding, no alligator clips- just laying down a circuit with copper tape!) This board is USB powered and programmed via an audio jack. The cable for power and uploading is included of course!

chibi clip2

Image from Chibitronics

Copper Tape and LEDs- The kit comes with 2 rolls of copper tape, 36 white LED stickers, 64 conductive fabric patches. Which is more than enough to make a few mistakes and still have tape and LEDs leftover!

The Stencil –  My daughter’s favorite thing in the kit (besides the story and the experience) is the Chibi stencil. She loved using the stencil to hide the Chibitronics logo all over the book.  As an educator, I loved the stencil because it helps when designing your own circuit traces.

colleengraveschibiclip9

Cost

Yes, the entire kit is expensive for an educator at $85 a kit. However, it’s well worth the price and the activities within will last you and your makers for months. While you might not be able to afford a class set, I’d suggest buying at least one to try it out yourself, or buy a few to try with a coding club. I’m planning on using mine in workshops to help independent learners that want to know more about programming paper circuits. If I had enough in my school budget to buy a class set for my coding club, I would! But for now, I’m going to buy a set of the Chibi Chip boards and supplement with the binder. (Maybe next year I can buy a set through Donors Choose or have a club fee? Things that make you go hmmm……)

Plus as a parent, I think it’s a beautiful gift for a child and well worth the money! (Probably best at 8 and up!)

Bottom Line?

The book and kit is amazing and worth every penny! It’s such a fun experience to be able to tinker and explore programming paper circuits in this binder. The Love to Code board is accessible for makers 8 and up, and the activities are easy to start and build schema quickly.

This set is one of the BEST low floor high ceiling tools in the maker ed market! 

Note: I did not get paid to write this post. I did receive the amazing binder for free and I am thankful to Jie and K-Fai for sharing their art with me. It is a beautiful resource!