Teaching Digital Naivetés?
I think it was around December when I started compiling resources for a lesson in Fake News. I found a ton of great resources from SLJ, the New York Times, and even a professor with a huge list of ideas for analyzing fake or click bait-y news. However, I still needed a class to teach! Then about a month ago, one of my freshmen teachers said, “I don’t want to do the same old research, I want to get my students to think for themselves!” We worked together and outlined what she wanted her students to be able to do and we both discussed that we didn’t want to focus on politics. Instead, our main goal is for our students to be able to read information and determine if it is accurate or not. We want our students to determine if the things they read hold biases and then be able to decipher fact from fiction.
This might seem like a simple goal, but the murky news waters of the Internet have complicated our student’s ability to reason. Did you know that students many of our students trust everything they see on the web? Even when it is obviously faked?
Flashback to my satirical unit I taught my high school juniors about six years ago using A Modest Proposal and articles from the Onion – they were disturbed and did not see the humor AT ALL in Jonathan Swift’s proposal or the hilariousness of the satire in an Onion article. (If interested in this ELA satire unit, it was based on some great lesson ideas from the book Strange Bedfellows.)
This absolute trust in what they see on the Internet is what Peter Adams calls “digital naiveté moments, when a student trusts a source of information that is obviously unreliable.” (Read more on Adam’s Edutopia post about the importance of teaching our kids to think critically regarding news literacy here.)
I realized that a lot of times we tell students to check the credibility of their sources during a research unit, but we never explicitly sit down and make sure our students know how to verify that information. (We might give them a checklist, but do we make sure they check each box?) So how can we teach students to be skeptical and not believe every viral video and click bait-y news source they see?
Here is the unit I developed with Ms. Jessup in broad concepts:
Media Literacy Unit
Day One:
- On the first day, I talk with students about the variety of fake news from viral videos, to false memes, to biased information (most of these videos and news links in this Adobe Spark presentation I found on this New York Times lesson). Throughout this sharing of videos and news links, I discuss with students how to identify and determine accurate information. At the end of this session, I have students fill out 5 random facts about “Fake News” that they learned from the day’s lesson. (I found this sketchnote from Sylvia Duckworth’s Sketchnotes for Beginners Google Slideshow, but it is also available here.) One of the things we felt it was important for students to understand was that the way others define fake news is not only just false information, sometimes others define “fake news” as something that is just not newsworthy.
Here are some student takeaways from the intro I shared about fake news :
Day One Cont: Pre-searching and Credibility
- After thinking about fake news, we discuss how to start looking at news (or any source of information) with a skeptical eye and how students can judge for credibility. Here’s what I give them for guidelines via a Media Literacy GoogleDoc :
- Pick a topic and start looking for articles with different biases. Update this Googledoc with a link to your news source (we’ll make proper citations next class period). Before even reading the article, start defining the credibility of your source by thinking about the guidelines below. In the credibility/bias section of your Gdoc, explain why you think this source is credible or not. Make sure to link to the author’s twitter, webpage, or list of other writings to prove your thinking. (You show your work in math, why not show your work in English?)
- Author Qualifications
- Who do they work for?
- Are they an expert in their field?
- Check LinkedIn , Twitter, Etc
- Reasonable
- Is it reasonable or outrageous?
- Source
- Who is the source?
- What do type of information does this site normally publish?
- Is it a site that normally publishes a certain type of news? What type?
- Are there lots of ads? What type of ads?
- Author Qualifications
- Pick a topic and start looking for articles with different biases. Update this Googledoc with a link to your news source (we’ll make proper citations next class period). Before even reading the article, start defining the credibility of your source by thinking about the guidelines below. In the credibility/bias section of your Gdoc, explain why you think this source is credible or not. Make sure to link to the author’s twitter, webpage, or list of other writings to prove your thinking. (You show your work in math, why not show your work in English?)
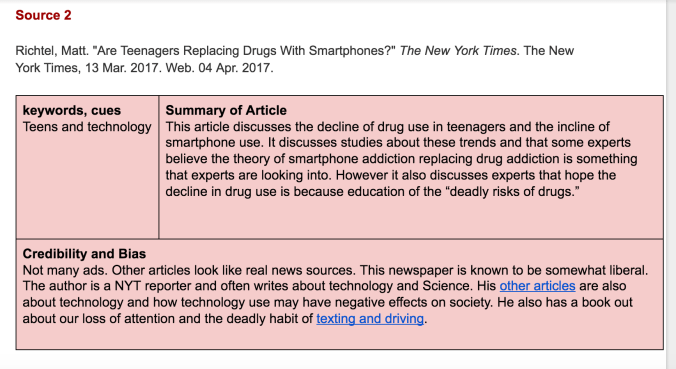
Here is an example of the information we want covered in the student’s annotated bibliography:
Day Two:
Students will bring up their Media Literacy Gdoc from the last class period. I’ll refresh some of our thinking about fake news and credibility and teach them a little about Advanced Google Searching. Students will keep track of their key search terms in their annotated bibliography and I’ll remind them how to create citations with Bibme.org (Plus, I’ll remind them to fill in missing info and fix the mistakes that the citation generator creates.)
Day Three:
On the third day, students have to make sure they have three varied sources for their annotated bibliography (and sources must be from the last two years). Citations must be created for each source and the credibility and bias of the author and the source should be defined. When students leave the library, Ms. Jessup is then going to have her freshmen create an argument about what they’ve researched and try to use their own biases to persuade others to believe his or her OPINION.
Now, it your turn
That’s our quick media literacy unit I created to help our students learn to be skeptical of what they see on the Internet. As I told my freshmen, “If I can get you to verify what you read and see on your phones is real and accurate before sharing, then I’ll be happy as a librarian!”
Now it’s your turn to share how you get students to think critically about news sources and information they read on the Internet. In what ways do you teach students to verify information and check for facts? How are you making sure the next generation looks at multiple sources before sharing and retweeting and spreading fake and viral news? Share your resources in the comments of this post!
Lastly, feel free to use this graphic I made in Canva to teach your own students how to think critically and evaluate sources for biased information. I made these as a “placemat” for classes and kept them available while students evaluated their news sources.