The Importance of Exploring Materials- Reflecting on #SXSWedu Part 2

This is the second post reflecting on SXSWedu 2017. Read the first post reflecting on the need for sharing our maker education classroom fails or what Sam Patterson calls the “anti-Instagram” moments.

Copy of colleengravesposts (1).png 

Exploring Materials in #4ways4makered

Four Ways for MakerEd was an excellent workshop at SXSWedu hosted by Christa FloresPatrick BenfieldSean Justice, and Erin Riley.

These fabulous maker educators set up four different explorations across this gigantic room and gave us time to play. After introductions, I hurried to the cardboard corner and began exploring cardboard techniques thanks to this cool handout from Erin Riley.


As I sat there playing with cardboard, those around me were making and building awesome things. I was feeling a bit uninspired making-wise, plus I was nervous about my own upcoming session.

Here I was in the middle of this room of so many awesome folks who were quickly inspired and making cool stuff.

And I had no ideas.

I was starting to feel pressure, because I’m a maker and I should be able to sit down and make cool stuff,right?

No. That’s not right. Sometimes even the most creative types can be uninspired. Instead I thought, “It’s okay. I’ll just play with cardboard and try all these cool techniques since I haven’t tried some of these before.” Meanwhile, my friend Liam built a chair out of cardboard, another guy at our table built a castle, and another learner made interesting cardboard art (with shadow play!)

Meanwhile, I was still cutting pieces out, putting them together and playing with techniques. Nothing creative or amazing….

Poll.jpg

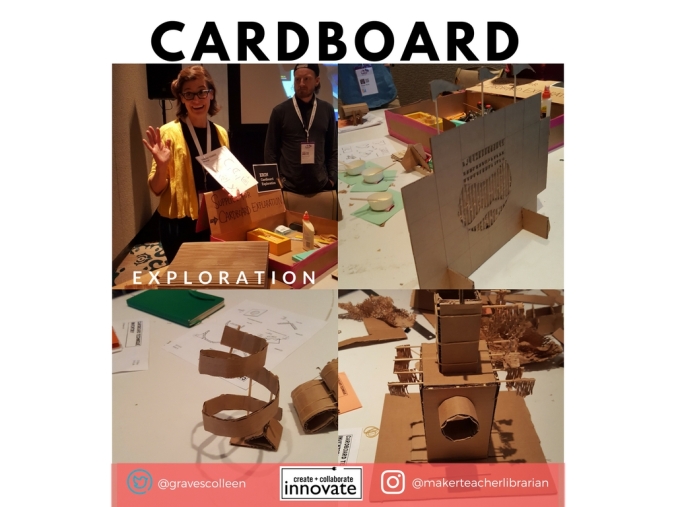
As I kept exploring cardboard, I started thinking it would be fun to play with linkages. However, there weren’t any brads to connect my pieces. I tried linking thin pieces with dowels and came up with interesting combinations, but it wasn’t really working as far as linkages go. I began to feel like I should just maybe give up, but I continued to explore the different techniques like straight cuts, smooth bends, and exposing corrugation. After awhile I decided to walk around the room to see what the other 3 groups were making. There were toy guts in one half of the room (Christa’s parts,purposes, and complexities), amazing makerspace designing in another (Patrick’s workshop), and a lightbulb/paper clip exploration (with Sean Justice.) Wait… did I just see paper clips? I bugged Sean for a few paper clips, and quickly went back to work at my table.

I cut four thin strips of cardboard and attached them with paper clips and within minutes I had a working grabber!  One of my table mates suggested using the “smooth joint technique” to attach grabbers to the end of my pinchers.

So even though I felt like I didn’t have any ideas, what I really needed was time to explore the materials and tinker with techniques. I just needed an hour to mess around, and that experience led me to a quick working prototype.

This was important lesson for me. Sometimes it is OKAY for our makers to just explore materials. It’s more than okay, exploration is a necessary form of making.

When reflecting later with Patrick Benfield he said, “All making is valid.” Patrick told me how at the d.lab he makes time for his makers to explore materials before building projects. Before teaching paper circuits, he lets his students explore making art with copper tape. Another aha moment for me! What might seem like a waste (exploring copper tape by making art/ exploring cardboard techniques and just cutting up cardboard) is not actually a waste.

Instead it is a learning experience that some of our makers really need. Exploring the materials might give them the creative confidence they need to inspire paper circuit designs or make some simple cardboard grabbers.

Reflections

When I interviewed Patrick this summer for Challenge Based Learning, we discussed the importance of reflection. As a writing teacher, I always felt like my students really synthesized their learning in that last critical step – reflecting on an experience.  It’s one reason I institute maker journals in my professional development workshops.

What is even more stunning is seeing other participants in the same workshop reflecting and having the same a-ha moments as me.  Notice in the tweet below, Nicole Cimo goes through the same process of exploring materials, manipulating techniques, and suddenly having an aha moment that leads to that creative confidence “We got this!” moment.

How do you let your learners explore materials? What techniques do you share that lead to creative confidence? In what ways do your learners reflect on their making and experiences? Share your stories and your work in the comments!


The Importance of Sharing Mistakes- Reflecting on #SXSWedu – Post One

Copy of colleengravesposts.png

Maker Confessions

#SXSWedu is a great convening of minds, life changing sessions, and amazing conversations in hallways, over coffee, and between sessions. It is those moments and casual conversations between that can have the biggest impact. On the first day I arrived at the conference, I found myself at the convention center with hours to go before any sessions started. I messaged Sam Patterson and Krissy Venosdale to see if they wanted to meet up and chat about maker education.

Podcast

After chatting with Sam about writing, teaching, and making mistakes… he decided we needed to make a quick podcast with Krissy. The next thing I know, we were huddled in Krissy’s hotel room and recording our “Maker Confessions” for a podcast episode. We discussed how it is just as important as maker educators for us to share our “anti-Instagram” moments and celebrate our failures as loudly as we celebrate successes. You need to listen to this conversation about failing, making mistakes, and how difficult it feel to share these moments via our positive social media accounts.

“Because we teach in a process-focused approach, we have to subvert the “product- focused” nature of social media and find safe ways to share our daily struggles. If this resonates with you, share your struggles with us and let’s all work together to keep the process visible.” – Sam Patterson

Listen to the full  podcast here.  

Twinkling Stuffies

During our conversation, I talked about the saga of George. At the beginning of the semester I challenged my sewing circuit club to design and make their own twinkling stuffies. I put together this example stuffie sewn with a Lilytwinkle controller and Lilypad LEDS.  I documented the process so I’d have picture tutorials to aide my students if they needed it.

Here is my final example:

Workshopping Stuffies

On the first day that students began designing stuffies, it became evident that a 1 to 15 teacher/ student ratio for designing and making stuffies was not going to work! I needed another sewing circuit expert (and plushie designer) to make it through! Luckily, one of the girls in my club is already an excellent plushie maker, and she helped a table of students design and make their own ideas.  (I also had an aide that quickly adapted to sewing with conductive thread and was able to help those that needed it.)

It was a loud and rambunctious hour with many students designing and cutting fabric and only a few kids made it to actually sewing on the battery holder. It quickly became evident to me that this workshop that I thought might take two hours, could possibly end up taking the whole semester. (And I’m not sure I can sustain interest in making a stuffie for an entire semester!)

The Working and Not Working

Seymour

After our second session, one student had a complete and working stuffie! His name is Seymour and I love the way his expression seems to change as different LEDs light up.

The Saga of George

On the opposite extreme of Seymour is George. The student sewing George moved quickly and had great success sewing the battery holder to the Lilytwinkle controller. I thought it meant she’d do well sewing the rest of her circuitry. I walked away to help others and came back to discover she’d sewn every pin of the controller together with her conductive thread. Curious as to what this would do, we alligator clipped from one pin to an LED. We were both surprised to learn that it still actually twinkled a bit, but as brightly as it should.

(Teaching note: If I had this to do over again, I’d have all kids sew their battery holder to the controller and then alligator clip LEDS before sewing to experience that each pin would sew only one conductive trace. This is the way I really learned how to sew circuits, but I didn’t think about it as being a necessary visual step that our learners might need! Lesson learned! )

For the next time we met, I told her to go ahead and sew from one pin to one LED and follow the suggested circuit paths.

Well…during that fated club meeting she sewed all of her positive traces and things were looking great. I told her, “Next time you come in, it will only take about five minutes to sew your negative trace and ground all of your LEDS.”

So… the next club meeting rolls around. The other students have moved on to making Makey Makey fabric switches and George is about to BE FINISHED! I see that the student has sewn the negative trace OVER the positive trace and I was like … oh boy… now what. More troubleshooting and problem solving led to me showing her how to insulate the circuit trace and for a moment… George lit up!

But it was short lived.

The way the circuits were sewn, it was just not going to work. At this point, we both admit defeat. It’s time to let go of the circuitry. I tell her, “You have two options. One, you can take the components out and resew now that you understand how to sew the circuits. Or you can take out the components and just finish George.” She didn’t want to sew the circuits again.She didn’t want to take the components out either. She just wanted George to be finished. It took some hemming and hawing, but we finally freed the components and another student helped her finish sewing George together. She came back the next morning to make George a cape and finish him completely. And you know what? George is cute even though he doesn’t light up. And the student still learned about sewing microcontrollers and LEDS with conductive thread. Yes, she’d really have the knowledge cemented in her head if she’d chosen to resew the circuit traces, but that’s for next time, right?

Moving Beyond Failures

Maybe saying we should “celebrate” our failures is too extreme. It isn’t that we should celebrate these moments as great things. BUT since our students see us failing and persevering everyday, we as maker educators should share and inform those around us that we often have things go wrong. We teach lessons that totally flop. We have projects that don’t work. We don’t label things and kids break components, or tear up rulers. It’s important to share when things go wrong. It helps us all teach just a little bit better everyday. So what’s your maker confession?