Making, Literacy, and Maker PD- Guest post on Edutopia

13

As an educator that taught in the English Language Arts classroom for almost a decade, I love exploring and playing with vocabulary and literacy. To me I see making as a logical blend of inquiry and literacy. That’s why I see the library as the perfect place to implement a makerspace in a school.

libraries-have-always-been-a-place-to-consume-books-and-create-knowledge


Exploring Literacy

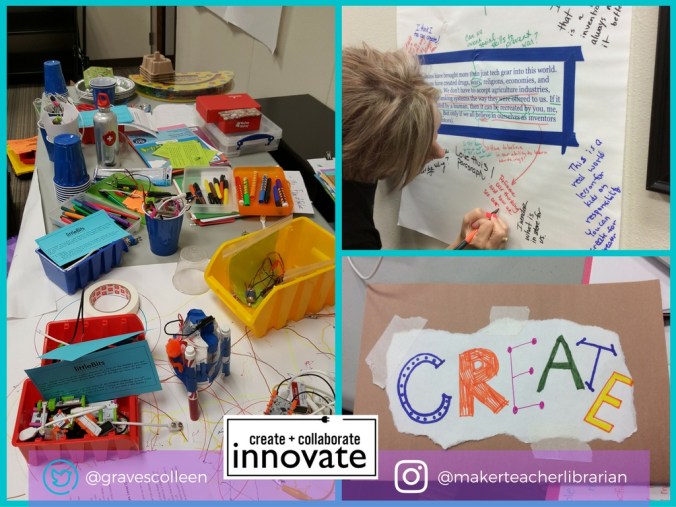
So when I host maker-focused professional development for teachers and librarians, I think it’s important for other educators to explore literacy and “maker” terminology in a playful context. However, it is equally important for all educators to realize that over-defining making and tinkering will close off avenues for our students (Don’t over-define a “makerspace” as a place with only high- tech equipment and close off crafts and creating with cardboard). Instead, we explore terminology as a way to think, learn, and interact playfully with words.  To do this, I have participants create maker journals to hold their learning.

“I think my new description of “making” includes “screwing up.” But also, “having fun. It’s important to remember that making includes screwing up, otherwise the fear (that I can’t do this) could take over.” – Amy Fletcher

You can read my whole post on Crafting Professional Development for Maker Educators over on Edutopia!

1

Documentation and Reflection

Another way these journals hold the learning is by giving educators (and students!) a time and a place to reflect. In case you missed it in the article, I love the way Amos Blanton, LEGO researcher and Manager of the LEGO Idea Studio, articulates the importance of documentation and reflection when learning through play in this video:

Teacher definition explorations from my workshops:

Since the definition explorations aren’t included in the article, I thought you might enjoy reading some of them here:

Making

  • “Creating in a unique way with readily available materials.”
  • “Seeing things through new eyes”
  • “Discovery”
  • “Playing to learn”
  • “Making is messy”
  • “Exploring and creating”
  • “Creating by tinkering and exploration”
  • “ Risking failure helps you learn”
  • “Is writing making? Putting together words to create?”

Tinkering

  • “Making sense of nonsense”
  • “Building to discover something new”
  • “Playing around with something to see how it works”
  • “Exploring with no clear path”

Design Challenge

  • “There is no right or wrong! Have Fun!”
  • “Ask students to create something by trial and error.”

Design Thinking

  • “Human centered design”
  • “Using the principles of design when solving a problem.”
  • “Process of creating, changing, and reattempting an idea.”
  • “Identify problem , question, brainstorm solutions, develop prototypes, test with users”

Invention Literacy Article Explorations

  • “I forget that re-invention is a part of invention. We can always make it better.”
  • “This is a real world lesson for kids on responsibility. You can create for the greater good of society.”
  • “Inventing has it’s own language, grammar rules, just like any language.”
  • “Thinking of inventing as pieces makes it more approachable and possible.”
  • “Becoming invention literate creates confidence.”
  • “Encouraging exploration and curiosity decreases fear of the world and each other.”
  • “Inventions are the birth of trial and error-things we cannot live without.”
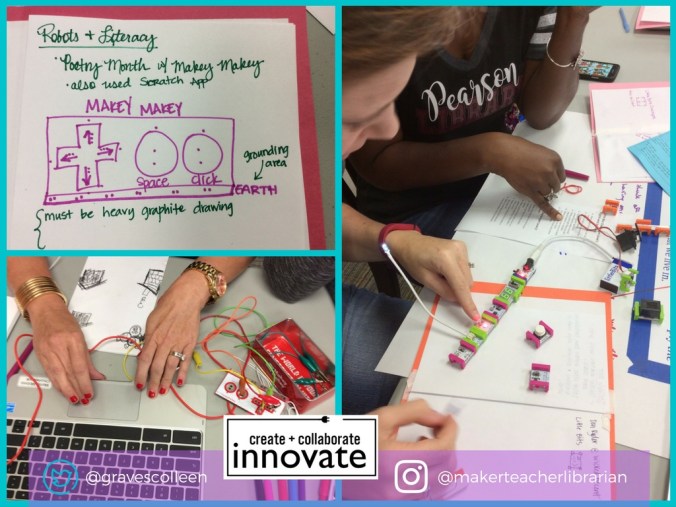
 

2

Hands-On Learning

Plus if you are interested in the types of hands on learning I offer in my workshops. Here is a sampling of activities that educators experience in my sessions and then reflect upon in their maker journals:

Food for Thought

As an aside: I noticed a couple of years ago that”tinkering” has a host of negative definitions. Quite recently I discovered this excellent quote by Resnick and Rosenbaum and would like you to think about this engaging way of learning:

“The tinkering approach is characterized by a playful, experimental, iterative style of engagement, in which makers are continually reassessing their goals, exploring new paths, and imagining new possibilities. Tinkering is undervalued (and even discouraged) in many educational settings today, but it is well aligned with the goals and spirit of the progressive-constructionist tradition—and, in our view, it is exactly what is needed to help young people prepare for life in today’s society.” (Resnick and Rosenbaum in Designing for Tinkerability)

Makerspace Storage


maker storage colleen gravesLast year during our Invention Literacy Research, I realized that I really did need to hyper-organize my maker supplies–especially when it comes to recyclables for prototyping! I’d begun organizing our electronics and other gadgets, but it was clear that everything needs to be clearly labeled to make materials more accessible for all students.

Enlisting Help

I may be a librarian, but I’m not the best at organizing, so I enlisted help from our Instructional Technology Specialist, Leslie Terronez. (Have you seen how awesomely she organized our Chromebooks?) I asked for her assistance in creating a labeling system and showed her the awesomely hyper-organized makerspace materials at Lighthouse Creativity Lab. We both loved the way they organized materials by type. (i.e. soft stuff, fasteners, etc.)

We began moving and inventorying our maker stuff and decided to sort our materials into these main categories: Electronics/ Crafts/ Supplies/ Prototyping/Tools

Since Leslie is an organizing Jedi Master, she decided to organize our labels by type font.

This slideshow requires JavaScript.

Mrs. Smalley and I began the tasking work of sorting our recyclables and other prototyping items into clear plastic storage bins. (This was after extensive time spent measuring the shelves and going to Staples to see what storage box sizes would best maximize our shelf space.)

Maker Materials and Prototyping Tools

I’d say that 1/3 of my Maker supplies are recyclables. Prototyping materials can range from cardboard tubes to weird round wheel like stuff.  Collecting materials like these depend on the types of things your students like to make. Watch their making patterns and gather materials that make sense for their making habits.

You may have a local re-use center where you can find interesting items or just garner ideas for the type of clean upcycling recyclables that work for making. (I just adore shopping at SCRAP Denton. Plus, if my space gets too overrun with reuse materials, I can donate leftovers to this great non-profit!)

Sometimes you won’t know what students need until you start labeling and marking materials. At one point, I was going to recycle some magazines, but decided to bring them up to the library instead. Right after labeling the storage bin, a student had the magazines over at the tinkering tables and was busy utilizing them for a school project.

littleBits

However, organizing electronics is a whole different ballgame.

If you have littleBits and need some ideas, I have a whole Librarian’s Guide to littleBits with tips for organizing, storing, and introducing to new classes. It is available for free download here!

I love these huge cabinets for storing my Pro Library because I can keep Bits organized and locked up if needed.  (And as a bonus, if Bits fall, they are still inside this metal cabinet safely away from feet! Thanks for the tip, #superlibrarianhubs! )

Aaron (the one and only #superlibrarianhubs) also has this great sign inside his cabinet that lets students know that to start inventing they have to pick up a power Bit from the circulation desk.

Sphero

Since Sphero robots need to be charged and ready to go, see my previous posts about organizing, circulation, and using Sphero with classes. (and Sphero Obstacle Course Challenge and Participatory Learning)

In Progress Shelf

While it isn’t storage per se, a makerspace isn’t complete without a “Works in Progress” space.  At Lamar, I had this space designated for works in progress. It really doesn’t take long for this space to get out of control… so you do have to do some regular maintenance if you see “in progress” projects sitting for a long time. I’m still working on this space at Ryan, (kids are already utilizing it, but it isn’t picture ready…) but I will update this post when it’s ready to share!

Sharing Awesome Student Work

It is equally important to have a space dedicated to sharing awesome student work! I’ve spent the last few years showcasing student work digitally, but I’m now in the process of making a permanent maker display to share what students at Ryan are creating. I’m hoping it will inspire even more students to come to the library to be creative and learn through hands- on experiences. If you haven’t seen my Instagram, I post daily things my students create and other library related madness.

How about you?

What are your plans for makerspace storage? What works for your students? How do you share student work? Please share your ideas in the comments below! 🙂