Capitol Hill Maker Faire
Aaron and I are getting prepped to leave for DC and join the festivities surrounding the National Week of Making. I’m very honored to be invited by the IMLS (Institute of Museum and Library Services) to speak on a daytime panel discussing Making and Education: K-12 for the Congressional Maker Caucus tomorrow. During the evening #CapMakerFaire, Aaron and I will be teaching faire goers how to make a simple electronic paper circuit(the IMLS estimates about 500 signups!).
Local Write -Up in Denton Record Chronicle
Our local paper featured a great write-up about my library and the maker movement here. Reporter Caitlyn Jones writes about my annual reporting of library statistics, and I’d like to share a little more about those statistics and talk about the importance of something I’m very passionate about- school libraries!

The Importance of School Libraries in a Rural, 90/90 or Low-Income School
Lately I’ve seen some terrifying trends of libraries ditching all of their books and some libraries completely ditching all traditional library services to start a makerspace.
It’s 2016, should we still be spending money on print books for libraries?
While many arguments have been raised about whether e-books will kill real books and life will start to look more like Fahrenheit 451, print books are still needed and necessary in today’s society.
As an early adapter, I found myself buying a Nook and reading constantly on it…. until one day… I didn’t.
I realized that I spend so much time looking at a computer screen all day, I would prefer to relax and take a break, with a REAL BOOK in my hand. Apparently, I am not alone as e-book sales are flattening and more independent bookstores are opening and thriving as suggested by this article from The Guardian.
But my preferential reading habits are not the only reason we need books in libraries (especially school libraries). We need books because not every district and not every school is providing equitable digital access. Many schools have not jumped on the 1:1 bandwagon. I know because I work at a school where students are not (yet) provided with devices for home use. But, even if my students were provided with a device, I’ve found out something very startling throughout the course of the school year.
Many of my students do not have Internet at home. Yes, some of them have phones with data plans, but they try to conserve this precious resource by using our school wifi as much as possible. (“Some smartphone owners – particularly younger adults, minorities and lower-income Americans – depend on their smartphone for internet access.” http://www.pewresearch.org/fact-tank/2015/04/01/6-facts-about-americans-and-their-smartphones/)
My students at Ryan still love to check out real books and hold them in their hands to read. I see these high schoolers reading real books in our comfy chairs everyday. When I started at Ryan I was happily surprised at seeing so many teenagers lounging and reading real books. The middle school librarians in Denton do a great job cultivating our teens love for reading. (Big Thank you to middle school librarian rockstars: Rhonda Thomas, Ivey Carey, Sandra Noles, Bonnie Mccormick and the countless elementary librarians too!)
Real books allow students to make real connections. The reading community loves to share and see what others are reading. Look at the trending hashtags on Instagram and you’ll see that not many (if any) people are posting pictures of e-readers. They post pictures of BOOKS. Because readers love books! (This is mainly in reference to books we read for enjoyment. Yes, most of us use e-books and databases for research. That’s why we need to grow our fiction sections and readable non-fiction. You should not get rid of all books in school libraries.)
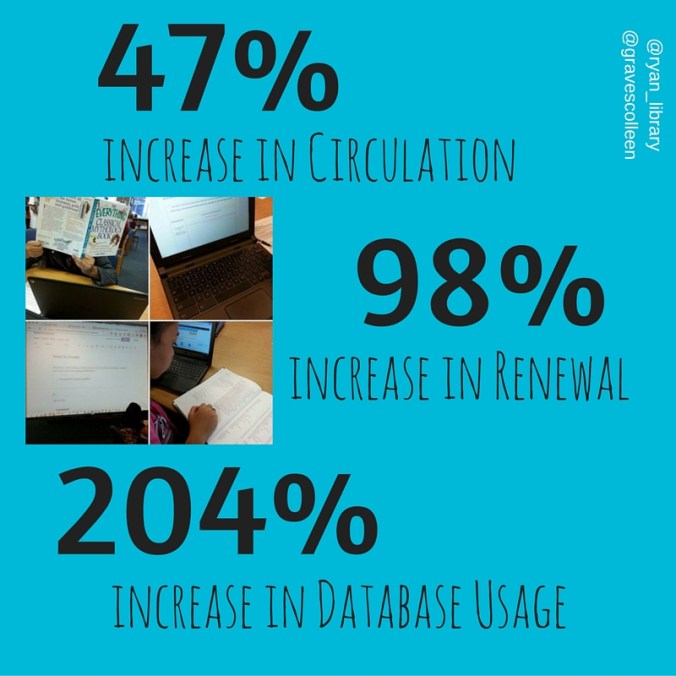
With all of the changes I made at Ryan this year, we saw a 47% increase in overall circulation! That’s actually down a bit from the circulation statistics midpoint in the year, but with springtime testing it makes sense that this number averaged out a bit.
Why does a Library Need a Certified Teacher?
Elissa Malespina wrote many great reasons to have a school library and a certified school librarian in this Open Letter to School Boards Everywhere published by School Library Journal.
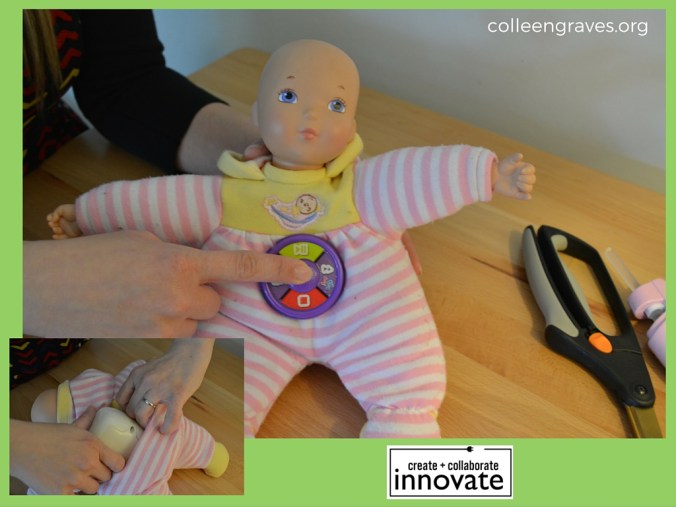
My job as an instructional partner is one of my favorite parts of working in schools. I love collaborating with teachers because we truly are better together. Some of my favorite collaborations to date are: Dot Day, All Songs Considered PBL, and a recent Invention Literacy Project (post coming) I worked on this last month with my ELA teacher, April Feranda. Plus, I wrote about quite a few awesome collaborations in this Digital Flyers for Library Advocacy for post.
I taught in the classroom for 9 years before getting what I consider a MUCH BIGGER CLASSROOM. The library is a central classroom for all of our learners at school. Why would you deny them access to a wealth of information all in one room? And why wouldn’t you want a certified librarian in that room to help them navigate the overcrowded waters of information in print and online?
This school year I co-taught over 400 classes. And those were only the classes I recorded in my calendar. There were drop in days and days where teachers extended their research time. During those classes, students performed over 296,000 academic searches related to research! It is important to have a certified, collaborative, instructional partner for our teachers. As a librarian, I can help teachers find resources, brainstorm new techniques, and even facilitate global connections for our students.
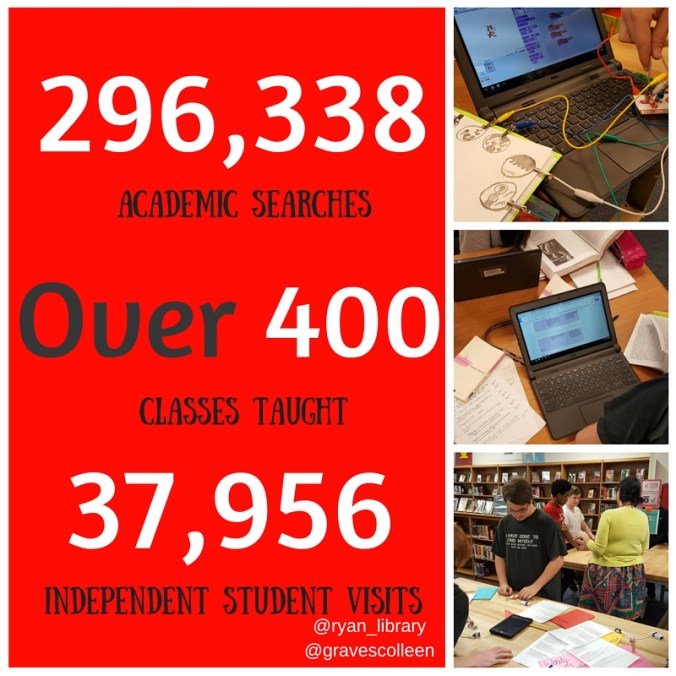
Another astounding fact on this Canva is that we recorded over 37,000 independent student visits to the library throughout the school year. This data is based off of the student sign in computer and students signing in when they come to the library without a scheduled class. (They come for lunch, to study, to get books, make stuff, see this post.)
Why does Maker Education Fit in the Library?
You know I love my library makerspace, but if we think about it for all schools, why is the library a good starting place?
All students have access to the library at all times during the day. They also have access to the materials in the library. If we want our students to become a “Nation of tinkerers” we have to house maker tools in a place where students can access equipment all throughout the school day.
Plus, we want students to feel like THEY can be anything or make anything they put their mind to. We want all of our students to feel like they can make something (or make meaning) at any point during the school day. Creating a safe environment to be creative, to make mistakes, and to learn… has always been our school library motto. So bringing making into the library? It just makes sense.
Many Types of Librarians Agree….
“I think making is a perfect fit with the library whether it’s in a school or public library. One thing I like about makerspaces in school libraries is that I think it sends the message that making is for everyone. If you locate the makerspace in the shop area or even arts area it can feel more closed to students not already engaged in those subjects.” Mary Glendening, Director of Middleton Free Library in Pennsylvania
“When doing focus groups in preparation for starting a maker program at my university, we learned a lot of people felt the existing equipment was siloed in various departments on campus, and they wanted greater access to it.” Sharona Ginsberg, Learning Technologies (Academic) Librarian at the State University of New York at Oswego.
“My makerspace does not take place over my library – it complements it. Most making is inquiry based. There’s a lot more research, tinkering and questioning going on because of the makerspace.” Gina Seymour, High School Maker Librarian and Co-director of Co-director of SlimeExpo.
“Maker activities allows kids to not just freely create, but to pour their true heart and individual expression into something that won’t be graded, judged, or otherwise rated in a way that might cause them to shut down. Allowing them to build in a failure-safe environment opens the door for students to engage in a way that makes their faces light up and experience things they might not have done on their own. Some important fact the student learned in the classroom that they weren’t comprehending before might suddenly stick once they have the opportunity to put their understanding into something tangible and made by and with their own two hands.” Stephen Tafoya of Garfield County Libraries.
Host Workshops and Hold Free Makerspace Time
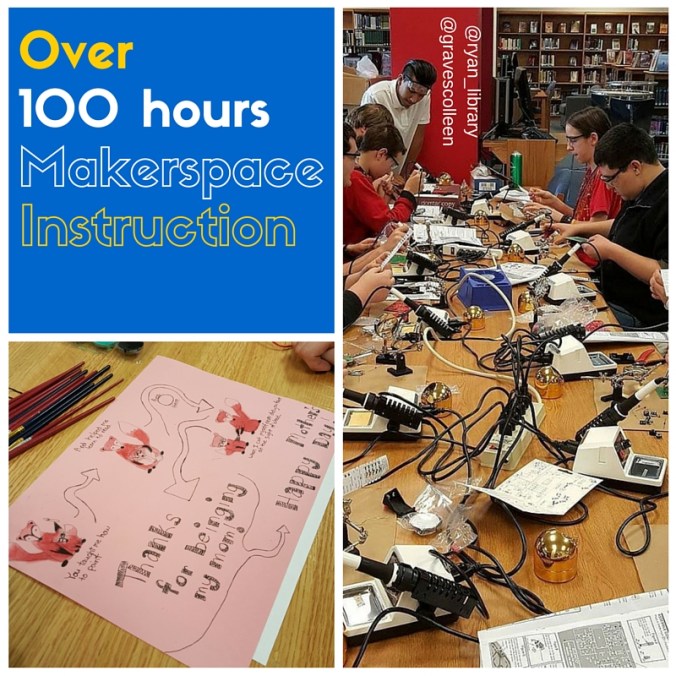
I’m passionate about letting kids make what they want, but I also want to give my kids many new skills so they can be the best maker they want to be! This school year at Ryan High School I was able to teach/host over 100 hours of guided makerspace workshops. While some of those were classes co-taught with teachers (like BLAST, Invention Literacy Project with Feranda to name a few, plus the public librarian Trey assisted with many workshops), the majority of makerspace instructional sessions were workshops that students attended during their free time! That means that my students signed up for projects and workshops because they wanted to learn even on their own time. They came to our library makerspace to learn to solder, make their own guitars, craft paper circuits, sew e-textiles, and more.
Garnering Resources
I’m thankful to have a very supportive administration. Plus, throughout the year, I was able to raise over $4,200 for makerspace items by receiving a Denton Public School Foundation Grant, getting multiple Donors Choose grants funded, and even asking for small donations from Sparkfun and Home Depot.
Donors Choose is an excellent way to fund your library makerspace and will often lead to surprising donors! Employees from Microsoft spread the word and helped fund our Creative Digital Media and Sound Engineering Equipment. Infosys Foundation funded half of our resources for our “Girls in Tech” workshop and Burlington Coat Factory matched donations for that grant as well!
When it comes to makerspace projects, crowd-funding is just as important to getting supplies as crowdsourcing is to the research element!

Makerspaces Need Passionate Facilitators
It is also pertinent to understand that staffing a makerspace is an issue. You do not want to force a makerspace into a library where the librarian is not passionate about making. A makerspace without a maker, is like a baker who doesn’t eat bread. It’s similar to hiring an English teacher who doesn’t enjoy writing. You need someone passionate about writing to engage and teach students to become better writers.
Making is the same way, you need a passionate facilitator who enjoys what they do. Not all library makerspaces have to focus on electronics and 3D printing. Your librarian might enjoy knitting and crafting. Start there. Create a culture of making and let it guide you and your students. But do not force making into a space where there is not a confident lead involved.
“A makerspace needs a facilitator because makers need someone who knows a little bit about everything in case they struggle with completing their ideas. The facilitator needs to know how the resources in the makerspace function so they can assist makers as needed. Plus, in a library/educational setting, a facilitator is needed to create programming for the makerspace.” (From this post.)
I also think a facilitator can add a little order to chaos. Makerspaces are messy and the equipment can be pricey. Just as a library needs a librarian to know what are the best books to order for their patrons, a makerspace needs a savvy librarian that knows what resources to order and how to best spend the budget so that resources don’t end up in a closet. (Plus, the school librarian will have the best idea on the pulse of the school.)
Aaron, the #superlibrarianhubs adds, ” You need someone there to help students with things like 3d printing, or to introduce using littleBits, or to help guide students before they get too frustrated or break expensive equipment. Just because a kid is good at designing things in Tinkercad, it doesn’t mean it will print well on your machine. You need someone who has the 3d printing experience (littlebits, etc) and knowledge to make sure your school doesn’t waste its resources. Plus, you’ll always have a constant rotation of students with varying skill levels. A maker librarian can adjust instruction to meet students at their skill level.”
To Reiterate….
It is important that schools and school districts understand, we want a makerspace in our library, but we do not want to take the library out of our makerspace.
Reading, research, and thinking go hand in hand with making.

Maker project books help all types of makers. Plus, reading fiction books can help relax a frustrated mind absorbed with solving a problem. Our library makerspace allows students to read and unwind, AND create and build. We need all types of materials and books if we want our makerspaces to succeed.