
This post is a long time coming! To celebrate the 10th anniversary of Lilypad Electronics (THANK YOU, Leah Buechley!!!), I’m reviewing SparkFun’s Lilypad Sewable Electronics Kit. This introductory kit came out last spring and SPOILER ALERT- it is a must-have for beginners interested in sewing circuits. (Educators and hobbyists alike!)

What’s in it?
So what’s inside the Lilypad Sewable Electronics Kit ?
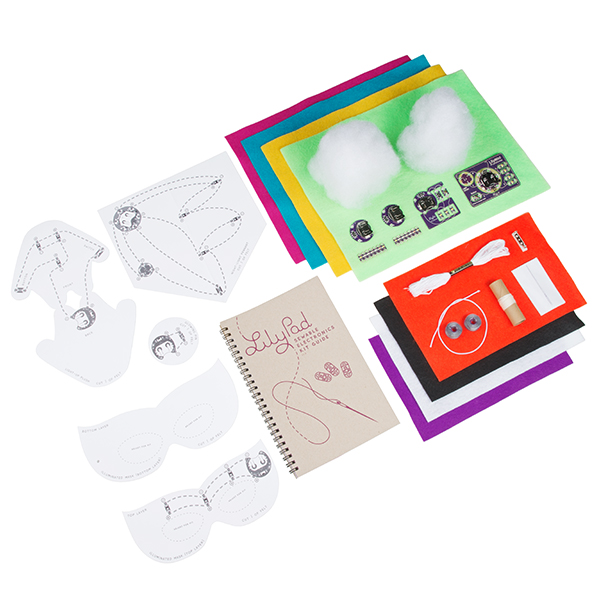
Picture from SparkFun
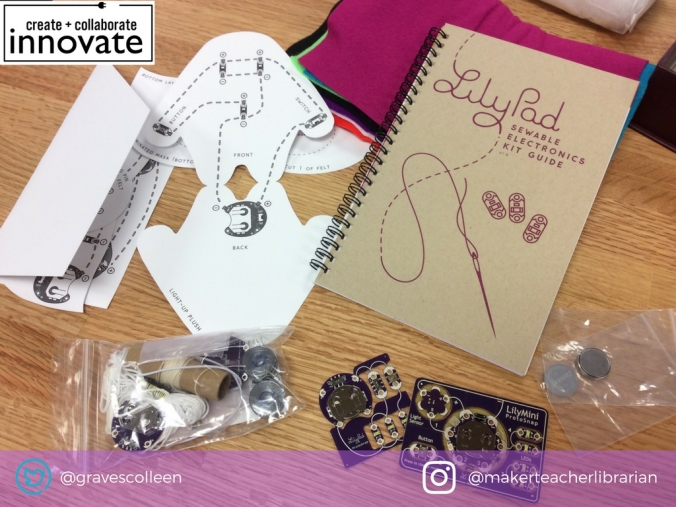
Inside the kit, is a full color glorious booklet with detailed drawings and instructions for four beginner projects. Beginners will learn to start sewing a simple circuit with a Glowing Pin, move to a light up mask made with a parallel circuit, then soldier on to sewing pre-programmed microcontrollers with the light-up plushie and night-sensing pennant.
The kit contains:
- Full color instruction booklet- IT’s BEAUTIFUL!
- Templates for all projects- compact and easy to follow/understand
- Lilypad Coin Cell Battery Holder (switched)
- E-sewing Protosnap- A rad connected, snappable board with LEDS connected to switches and battery holder.
- LilyMini Protosnap – The LilyMini microcontroller is connected to a button, a sensor, and two pairs of LEDs. Since it’s pre-wired and connected, users can see what the behavior is like before sewing to a project. (Without having to alligator clip components together.)
- Sewable Lilypad LEDs
- 2 glorious spools of Conductive Thread
- Sewing needles, felt, stuffing, embroidery thread; basically everything you need to make the four projects in the kit!
What can I make with it?
There are four projects outlined in the kit. My goal was to make each, but of course I cheated a bit. Above is a twinkling stuffie I designed to inspire my high school sewing circuit club. Below is a stuffie sewn with LilyMini when it was in the pre-production phase. (I followed the instructions for the light up pennant, but moved the circuit around a bit and decided to make a stuffie instead of a hanging pennant.) It utilizes the light sensor and glistens in like morning dew in the sunshine.
Two summers ago, I made this blinging badge to wear during my Maker Education panel at the Capitol Hill Maker Faire. It utilizes a pre-programmed LilyMini and was a super fun one hour project.
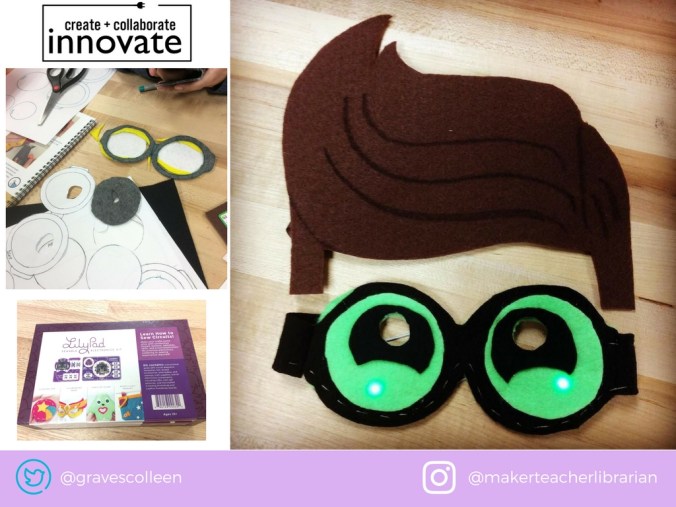
I dug the illuminated mask that came in the kit, but thought it would be fun to make a cosplay style LEGO mask. This LEGO Robin mask template can even double as a Minion mask!
 My next project was to make some fan art in the form of an embroidered/illuminated Schwartz ring in honor of my favorite movie, SpaceBalls. I re-programmed the LilyMini, embroidered a Yogurt fist with ring, but stalled out in the final steps of the project because we were moving. So that project is still in progress, but I’ll share it when it’s finished.
All in all, a lot of learning is packed into this compact kit! One can learn to sew pre-programmed electronics and hopefully have enough experience at the end to start creating and programming their own e-textiles.
One of my favorite things about the kit are the inclusion of the pre-wired protosnaps.
Here’s a video of the pre-wired LilyMini Protosnap, so you can bask in it’s blinky glory:
Bottom Line
At around 100 bucks, it’s too much to buy a ton of these kits to run a class workshop, BUT it is a great kit for educators who want to start sewing circuits and aren’t sure where to start. It takes the guess work out of what materials and components to buy. The instructions are clear and easy to follow. If I could, I’d probably buy a class set of the instruction booklet because it is JUST SO RAD. Then buy components based on what my students wanted to make.
The introductory projects are fun, engaging, and inspiring. Plus, each project is open enough to function as inspiration for more difficult projects that you or your students can design and create if you don’t want to follow the templates.
I love the pre-wired protosnap concept. It allows makers to see the functioning circuit before sewing their own circuit traces. I think it’s helpful in allowing creators to come up with their own design, but it’s also helpful in teaching those to new to electronics the concept of wiring a circuit.
As an aside: For my own sewing circuit club, I bought the e-textiles lab pack. This pack holds enough resources for 10 makers to create LilyTwinkle projects. The only downside to the lab pack is that it doesn’t have a programmable board included.
If you are wanting to try sewing circuits, you can buy yourself most of this Lilypad swag from Sparkfun with their Black Friday/Cyber Monday sale that has almost everything at 20% off.
More Sewing Circuit Resources:
Here’s a running list of my sewing circuit resources.
- My first #sewingcircuits workshop
- An Intro to Sewing Circuits Affordably
- My Chibitronics Stuffie
- My sewable battery holder on Tinkercad with easier access to battery
- My Twinkling Stuffie Workshop
- Chapter Six of our #bigmakerbook
- Wearable projects in our #evilmakeybook – The assistive technology pillow in the Power Tail Prank project is one of my favorite simple e-textile projects I’ve ever made!
Awesome Sewing Circuit Resources from others:
Plus, some more rad e-textile resources from my favorite makers.
- Sew Electric by Leah Buechley
- Kobakant – An amazing resource of wearables by Mika Satomi and Hannah Perner-Wilson
- Gella Craft Instagram – Angela Sheehan from SparkFun has a pretty sparkly new Instagram account with daily doses of awesome
- Lilypad Resource Center from SparkFun
- Diana Rendina’s Bracelet Workshop
- Tinkering Studio’s Sewn Circuit Pdf
- Kristi Taylor’s Introduction to Electronics Youtube video
- Karen Blumberg’s curated list of sewable battery holders
Want More?
I’ve got a few projects in my head and am considering writing an introductory sewing circuit book, would you be interested in such a resource, dear readers?


