What a Makerspace can mean for the Writing Classroom -Takeaways from NWP Annual Meeting

colleengravesposts (8).pngSession Info

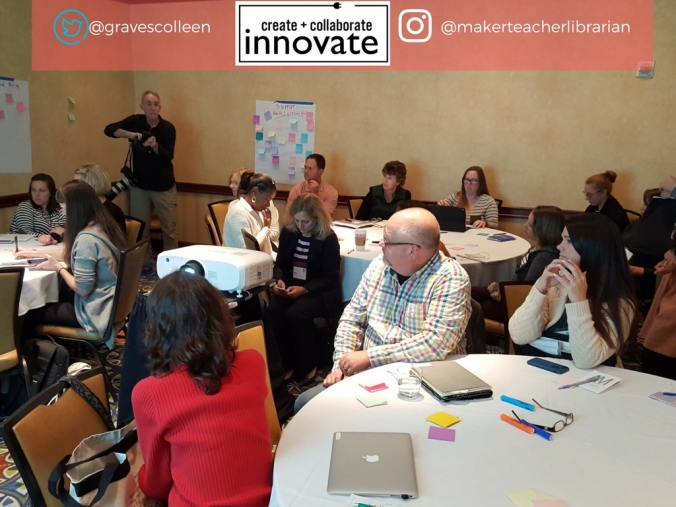
In our interactive session for “Makerspace in the Library: What it means for your Classroom,” we really let our participants drive the learning.

We started out with an introduction for each expert presenter (here is our slidedeck with presenter info and resources we referred to during the session.) Then the rest of the learning was hashed out through lively table discussions.

Other Workshop Leaders:

  • Buffy Hamilton, Title I Writing teacher, former librarian; Atlanta, GA
  • Zach Duensing, Nashville Public Library
  • Valerie Jopeck, Elementary Library Education Specialist, Fairfax County Public Schools, VA
  • K-Fai Steele, Program Associate, National Writing Project


colleengraves-org1

We asked our participants some simple questions to help divide our learning up into different themes.  (Thanks for these guiding questions, K-fai!)

  • Why are you interested in makerspaces?
  • What questions do you have?
  • How have you connected (or not) with them?

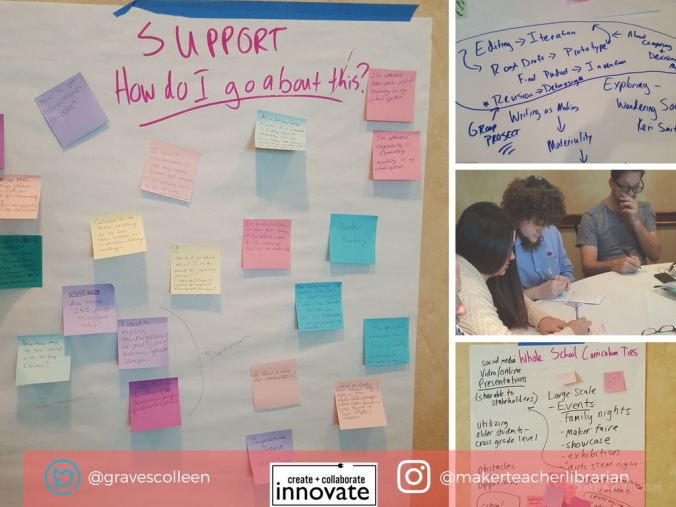
Our writers wrote ideas on Post-its and then we divided these post-its into overarching themes.
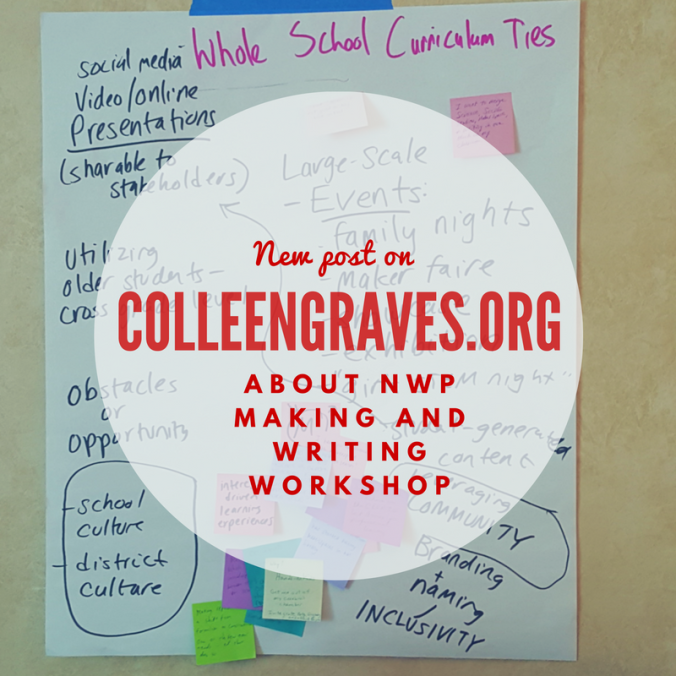
colleengraves-org2

Emerging Themes

It quickly became evident that our communal thinking could be divided up as:

  • Support: How do I go about starting this?
  • Whole School Curriculum Ties
  • Community
  • Writing and Making (and how it could tie to research and inquiry)

Each presenter took a table and we dug deeper into the conversation.

Community and Whole School Curriculum Ties

Valerie and Buffy’s table really thought about creating school and district cultures that led to making. They discussed “student generated content that educators could share with stakeholders via social media and online platforms.” They also stressed the importance of leveraging community and creating inclusive spaces.  One of my favorite suggestions was the idea of holding different types of “Large Scale Events” like:

  • Family Nights
  • Maker Faire
  • Showcase
  • Exhibition
  • “Girls Stem Nights”

Writing and Making

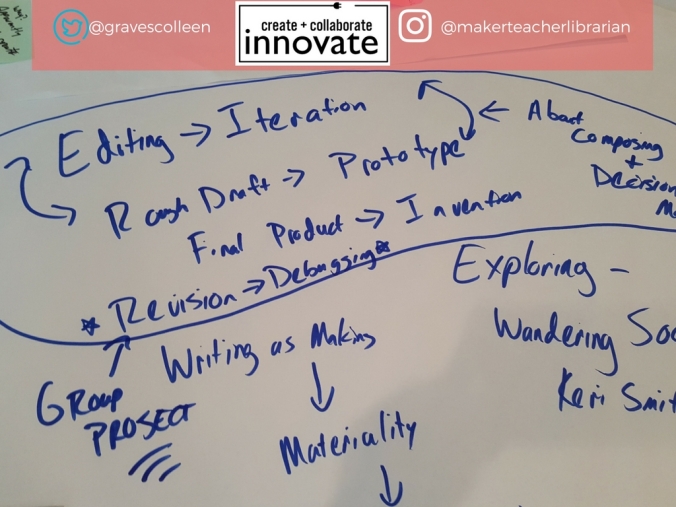
My table discussed how we can embrace making as writing teachers. One of the biggest a-has at our table was a great idea sparked by Valerie’s statement during her intro, “What you call editing, we call iteration.” My table quickly got to work discussing how many steps in the making process parallel with the writing process.

writing-and-making-colleen-graves-org

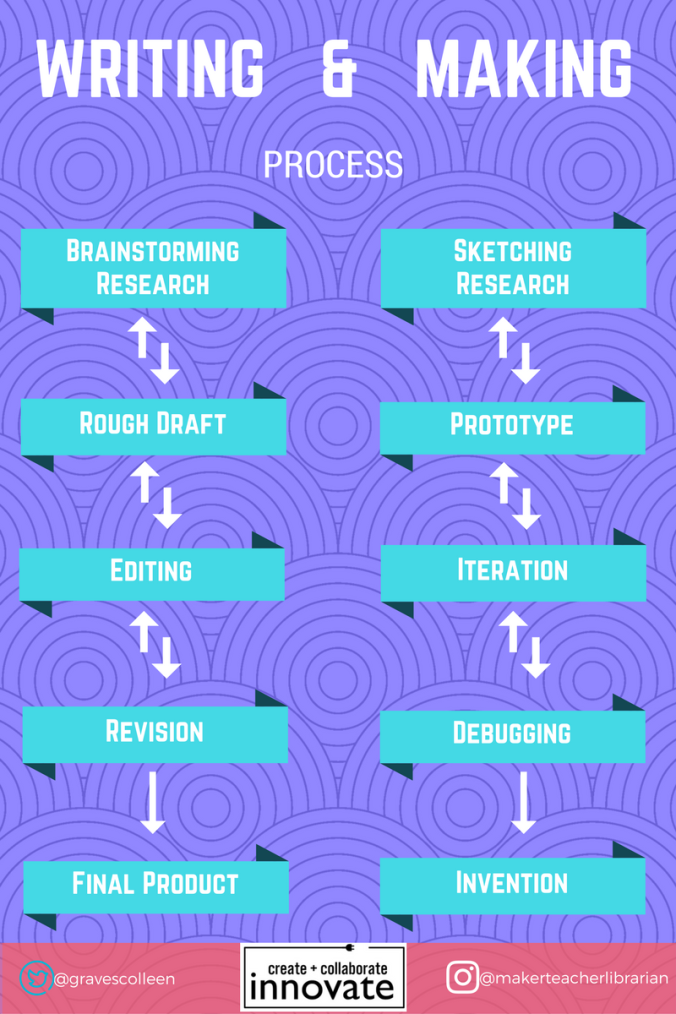
  • Brainstorming>Sketching/Research
  • Rough Draft> Prototype
  • Editing> Iteration
  • Revision> Debugging
  • Final Product >Invention

What I loved about this conversation was the idea that many of us stay in this constant conversation of creating rough drafts and making revisions when writing. Just as many maker projects stay heavily embedded in research and iterations.  Many times in both forms, not all of projects end up as final drafts (i.e. inventions!) But as one of my table members said, “Just the idea that writing is making lends to teaching the materiality of writing and focuses on collaboration in such a multi-model context.  This allows students to reflect, grow, persevere, and re-vision their work.”

We also discussed the importance of revision and debugging as a group project. That many times in the “real world” this revision is done in a collaborative nature.  We bring our busted prototypes out to others and ask, “How can we make this better?”

What makes this conversation even more important, is that lately many of us in the maker movement have been stressing the importance of process over product. The real learning happens during the process of making, not looking at a final invention. Sometimes, our student’s final invention is just a cardboard tube with a strawberry container on top. It looks like trash, but to the eye of the inventor, it’s a magnificent bird feeder. (Thanks to my own kid for this anecdote!) The real meaning students get from making is in the process. Not the product.  A 3D printed object isn’t the learning, the student designing a 3D model in software is where the real learning takes place. Although, after printing their first iteration, they might realize they need to revise their design (i.e. debug) so that their 3D printed object comes out as one piece, can stand up, or whatever flaw they realize after printing a prototype. The 3D printed object helps them see how to revise their design before printing another iteration.  As my table mates pointed out, this stage of drafting (prototyping) and editing (creating iterations) is about composing and decision making.

colleengraves-org3

Reflection as Process

Another huge aha for my table was the idea that writing a reflection about the writing process is difficult. However, when students write a reflection after making, reflecting is easier because of the deep thinking that occurs during the process of making. One table member said, “Could we use this idea of reflective writing after making to help give our students the taxonomy for reflecting on their writing process? Will there be a transference of learning?”  During our share out, another participant noted that “reflection is based on awareness and when students are making with their hands they are hyper aware of their actions (vs when they are writing.)”

Collectively we decided that “reflective writing post making is much richer and that we could use maker journals as a place to help capture this learning.”

Making as Procedural Writing

Another favorite aha moment was when someone said, “No one sat down and wrote a cookbook, they cooked a lot first!” So if we decide as teachers to incorporate procedural writing with our makers, we have to let them make a lot BEFORE we ask them to attempt writing out their steps for procedural writing.

More Big Ideas from Learners

Power of Play: “Making gives us the ability to reseat the role of writing outside of our normal writing assignments. It allows us to take apart writing.”

Engagement: “(It) Provides interest-driven learning experiences for students” and “Students construct knowledge and really take ownership of new learning.”

Change: “Making represents a shift from formalism to constructivism. One of the few recent trends in education that does so.” and “A makerspace breaks out of traditional education.”

Interdisciplinary: “Making is a vehicle to facilitate interdisciplinary collaboration between teachers and learning for students.”

Real World: “We want to link our makerspace / innovation space to Problem Based Learning to respond to community and real world concerns through STEAM partnerships.”

Final Takeaways

I was honored to be invited and to be among such an all star panel of librarians! It was such a great session and I loved being surrounded by teachers who see the connection between making and literacy. Plus, I adored discovering together how the processes of making and writing mirror each other and discussing how the conversation between making and writing can help our students grow in both areas. I also realized I need to make time to come to the National Writing Project Meeting EVERY YEAR! What a great group of educators!

How about you? How do you see the connection between making and writing?


An Intro to Sewing Circuits Affordably

colleengravessewing1

Paper Circuits to Sewing Circuits

In our #bigmakerbook, I suggest crafting with paper circuits to learn about simple and parallel circuits before delving into sewing circuitry. Last year, my GirlsinTech campers had a great time with paper circuits, but when we began to explore sewing circuits, they ran into many roadblocks. Some had never sewn before, some couldn’t thread the needle, some had pre-conceived ideas about sewing that led to disastrous short circuits, etc. (Note: I did have great success with teaching a parallel circuit bracelet at the DPL, but I also had 3 extra helpers for that workshop!)  So I wanted to try something new this year to get students started sewing and creating circuitry knowledge, but still keep the project simple. I wanted to share that project with you, and give you a list of some of my favorite sewing electronics books that aided me in my own journey to learning about creating and debugging soft circuits.

Keeping it Simple

Last year my students learned about circuits with paper circuits and jumped right into sewing parallel circuit bracelets. Instead of sewing a parallel circuit first this year, I wanted my students to really learn and understand the concept behind sewing a circuit. (Plus, I really want students to be able to go further throughout this year with soft circuits and programming.) Lastly, I wanted their learning to be really visible AND I wanted to make it a really easy project if they had never hand sewn, but still appeal to an expert.

In talking with Josh Burker about some ideas for our workshop during the PineCrest Innovation Institute (info in upcoming post!), I’d thought about adding a sewing circuit element to a workshop. My idea was to share a simple circuit template in an embroidery hoop and let participants add their own artistic flair around the light with fabric paint, markers, embroidery floss, etc.

A few days after our conversation, I realized that this would be a great way to start my club that is focused on learning sewing AND learning about electronics. I wanted to keep it simple by just teaching them how to hand sew with conductive thread (on white fabric so they can see their stitches!) and then each tips on embroidery techniques so my students can design with thread.

I made my own example, but only created the circuit and left my embroidery half-baked. I did this because this summer when I was knee deep in LEGO tinkering, I was struck by a tweet from Ryan Jenkins of the Tinkering Studio. This tweet stressed the importance of creating a “half-baked” idea or prototype because this would “invite participation” more than a fully baked idea that might not “instigate” a learning experience. Ryan and I spoke at length about this concept when I interviewed him for Challenge-Based Learning in the School Library Makerspace.

https://twitter.com/ryanejenkins/status/733163614408859649

I realized that up to this point, I had made some half- baked prototypes on the fly just trying to get my kids interested (and it worked so well!), but then I’d started fully baking some prototypes which did not always lead to student participation.

As Patrick Ferrell of Harris County Public Library added, these half-baked examples get our patrons thinking they can not only make their own, but make one even better!

Below is my simple circuit with a couple of embroidery stitch examples.  I’m hoping to turn it into a cute spidery monster head with a glowing eye.  I promoted the heck out of the club, added new students to my Remind and hoped they would show up Thursday after school! As I was gathering my supplies, I realized I needed more coin cell battery holders.

colleengravessewing2

Affordable Battery Holder

Since the cheapest coin cell battery holder to buy is two dollars a unit, I decided I wanted to try and make my own battery holder to keep costs low for my club. I found this great tutorial on sewing your own battery holder , but I didn’t have any neoprene fabric, and I was unsure about the safety of creating a battery holder with a different material.

I looked on Thingiverse and found this battery holder then uploaded it to Tinkercad for hacking. If you know much about me, you’ll know that I’m not really that into 3D design. So I messed around and added some ends for conductive fabric tape, and attempted a sewable hole. The first one I made, the battery didn’t fit. So I did some measurements and tried again. I used my new favorite tool conductive fabric tape from the Makey Makey Inventor Booster Kit to function as the battery tabs. It worked! I fabricated my first useful 3d printed thing and I was ready to manufacture! 🙂

It worked well for my students, but I realized I really did need to make a better hole for sewing each tab to the fabric. I asked for expert help from one of my favorite makers….

Thanks to Aaron Graves for helping me make this file presentable! (He helped me adjust the “thing” to the workplane, re-taught me about aligning shapes, and helped make the holes sewable!) Feel free to hack, reuse, and make your own!

Screen Shot 2017-01-20 at 2.16.11 PM.png


Update 1/20: I’ve since updated this battery holder so that it can be sewn as part of the project and resemble a pirate eyepatch!

https://tinkercad.com/embed/b2bI4iwkJy9?editbtn=1
Screen Shot 2017-06-27 at 7.12.08 AM.png

What Students Made

At our first meeting, we were a small, but mighty group! Which was a really good thing, because all of the girls were successful in sewing their first circuit!

colleengravessewing3

Plus, my half-baked prototype worked swimmingly! The girls did not even follow my pattern for sewing a simple circuit, they forged their own paths. Like any great maker project, some students created simple designs, and others who were already knowledgable with sewing, took it further. One even sewed a cat with her conductive thread! I had to teach her about insulating threads on the fly. Another student decided to try and hide most of her circuitry and is already skilled at embroidering and ready to create her own artistic monster/robot/idea.  Overall it took them about an hour to sew a simple circuit.

The girls happily displayed their projects on the project shelf and asked if we can meet every week! (I have students store projects like these at the library so I can help with debugging as needed.)

colleengravessewing4colleengravessewing5

Embroidery Stitches

Now that they’ve sewn their first circuit, I’m going to teach club members different stitches so they can add their own creative ideas to their work using this great tutorial for learning different types of stitches. The circuit is important, but I’m excited to see how this gets them creatively stitching and inspires them to design art with thread.

Great Resources for Sewing Circuit/Soft Circuit/E-Textile

If you are new to sewing circuits and are looking for more resources, here are a lot of things that guided me along the way. Read my past post about teaching a sewing circuit class at the Denton Public Library.  Plus, our Big Book of Makerspace Projects has a full chapter of sewing circuits that range from very simple to very complex!